I had originally planned on making a cookie platter for New Years, but after all the enormous amounts of sugar, chocolate and candy canes over Christmas I decided to start the new year off with something healthy.
My parents had sent me a huge box of persimmons from their backyard so that was my inspiration. Persimmons are one of my most favorite fruits! Luv the crunch. The fruits were served with a vanilla yogurt dip.
I also made a vegetable platter of cucumbers, carrots and broccoli with a Greek Yogurt and Paprika dip.
A couple weeks later we had another family get together. I made another fruit platter, but this time left out the yogurt dip to let the fruits run the show.
Today is my beloved Lola Espie's birthday. She would have been 92 years old today. Oh how I miss her so! I celebrated her birthday by baking two dozen red velvet cupcakes with Neufchâtel cheese frosting for my family. In case you haven't heard of this cheese before it's actually a lighter version of cream cheese. I used the Philadelphia version which you've likely seen before in the grocery store marked as "1/3 less fat cream cheese." It has a lower fat content and more moisture than regular cream cheese which made me feel a little less guilty, but I still used the same amount of sugar so you really couldn't taste the difference ;)
I love polvoron! In case you haven't tried them before they are this divine Filipino dessert that is often described as a milk candy and is similar to a shortbread cookie.
I used this yummy recipe and super helpful polvoron shaper from Ddaisys. I decided to add a little Christmas spirit to the polvoron by dipping them in chocolate and adding sprinkles.
In case you're trying this at home, make sure to refrigerate or freeze (if you're in a hurry) the polvoron prior to dipping them in the chocolate. The candies are so delicate that they'll just fall apart in the chocolate.
I added these cute little candies to a dessert basket along with Ghiradelli Candy Cane Brownies and Candy Cane Joe Joe Rice Krispie Treats drizzled with of course...more chocolate.
I recently got this pastry tamper and 2 silicone mini muffin pans from Ddaisys. My order also came with a recipe for pecan tarts. The tarts came out so cute...and delicious! So, for Thanksgiving I was inspired to create a platter of mini desserts.
I had tons of persimmons from my dad's persimmon tree so decided to make persimmon streusel bread. I was also craving for Ube Macapuno Cheesecake bites. We were planning on going to two Thanksgiving parties so I doubled up the recipes and made two platters.
Skewers were trimmed to make them a little shorter and labels printed so that family would know what they were devouring. The pecan tarts were the first to disappear!
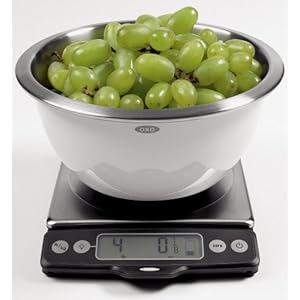
I had heard many times that a kitchen scale should be used to measure dry ingredients, but after reading in Cook's Illustrated that measurements can be off as much as 10 percent I was convinced. After doing some research I had my heart set on this gorgeous OXO Stainless Steel Food Scale.
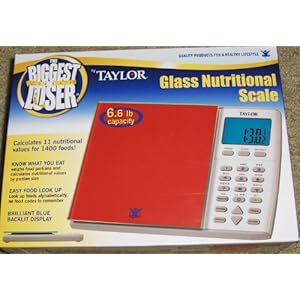
It had all the important features which I learned are needed in a kitchen scale and additionally had a pull-out display for weighing large items. The drawback as the article states was the $50 price. I was saving up and waiting for it to go on sale when to my surprise my hubbie comes home with this not-so sexy, red white and blue Biggest Loser Nutrition Scale
I tried so hard to hide my disappointment, but it was written all over my face. It wasn't just that it wasn't as shiny and pretty as the OXO scale, and that I luv OXO products. Really I'm one of those people that is super anti-diet. I didn't want a nutrition scale to help me count calories. I wanted a kitchen scale to help me measure loads of butter!
However, my hubbie got a great deal on the nutrition scale for only $13.99! I was also way too curious to see how off my measurements were, so I eventually gave in and decided to keep this scale and try it out.
In terms of the cookie recipe, I came across this interesting Complex Chewy Gooey Good Chocolate Chip Cookies recipe after reading an article on the 5 Tips for the Perfect Chocolate Chip Cookie. One of the tips was to use cornstarch, so I started scouring the internets for a recipe. I was pleasantly surprised to come across the Chewy Gooey recipe because it used wheat flour.
The kitchen scale was easy to use. The big challenge was converting the measurements in the recipe from cups, tablespoons and teaspoons to grams. I didn't think it was going to be that difficult but ended up having to ask the internets several times.
On my first try with the wheat flour I had too much, so I scooped out until I got to 180 g (1.5 cups).
Same happened with the all-purpose flour.
For the brown sugar I had some packing and ingredient issues. The recipe called for a combo of light and brown sugar, but I only had golden. Joy of Baking states that a cup of packed light brown sugar is 218g and packed dark brown sugar is 238g. I was shooting for 228g, but wow was I off! I ran out of brown sugar and didn't have time to run to the store so substituted the rest of the needed brown sugar using granulated sugar.
For the 1/4c of granulated sugar I was not expecting any issues. Granulated sugar is not light and fluffy like flour, but somehow leveling off w/ the spatula was not sufficient. I added until I got to 50g.
And finally the chocolate chips. I decided to use chunks. The scale was also super useful here because of all the space between the chunks in the measuring cup. I would have been missing out on a bunch of chocolate!
I tried using the scale for the cornstarch, but it was difficult to find a conversion for teaspoons so eventually gave up and figured I did good just on the large dry ingredients.
The recipe made me giggle when it told me to "cream until you can cream no more" and "beat excessively". After mixing the ingredients I used an ice cream scoop to scoop out the dough. I was also interested in testing out the 48 hour refrigeration tip.
From past experience I knew I had to scoop out the dough before refrigerating (my poor little cookie scooper). I got lazy and put all the scoops in a single bowl, thinking it would be easy to pry them apart, but alas no. So I'd recommend layering them in parchment or plastic.
Here we are after 8 hours of refrigeration. After putting them on parchment on cookie sheets I flattened the tops. I learned this in a baking class and makes for a prettier, even cookie.
And the finished product. Look at them sparkle!
Here's a summary of how my measuring improved with the kitchen scale (or really how bad I was without it). Wow, I don't know how a Virgo like me has gone this long without a scale. Averaged about 11% off. Pretty close to Cooks Illustrated's analysis.
Ingredient
Expected Weight
My Weight
% off
1-1/2c Gold Medal Wheat Flour
180g
200g
11%
1c Gold Medal All-Purpose Flour
120g
132g
10%
1c Golden Brown Sugar
228g
178g
22%
1/4c Granulated Sugar
50g
48g
2%
2c Chocolate Chips
12 oz
11 oz
8%
As for the 48 hour tip, I'll need to do more testing. There was no easy way to halve this recipe with the 1 egg + 1 egg yolk and I was not prepared to have my family of 4 test out so many batches of cookies.
After the 24 and 48 hour intervals the cookies still tasted damn good. It's hard to judge the difference unless you have them all in hand, but I can tell you after 48 hours of refrigerating the dough, it produced a much thicker cookie that hardly spread. I thought all this time that is what I wanted - a super thick, chewy cookie. However, I didn't like that the diameter was smaller. Perhaps I'll use an XL ice cream scoop next time.
I am so happy with our new kitchen scale and confident that I can reproduce these amazing cookies as needed. I have to say these are some of the best cookies I've ever made (although I say that practically every time I bake cookies, hehe). My family had absolutely no idea there was wheat flour in there. This recipe is definitely a keeper!
Also, since we saved $35 instead of buying the OXO scale, I finally splurged on a self healing mat for my sewing adventures. Yay! Thanks to my wonderful hubbie for finding the great deal on the scale!
I've been disappointed for a while...offended even, by the poor quality and high costs of Halloween costumes. When my daughter told me she wanted to be a chef this year I decided this was finally going to be the year I try to sew a costume. Up til now my sewing skills included sewing buttons and simple hems so this was definitely going to be an adventure. Since I'd never really sewn clothing before, I decided to start with the chef's hat. If that turned out well then I'd be ready to take on the apron.
I found this awesome chef's hat tutorial and my daughter picked out the cutest purple fabrics from Hancock's Fabrics. I dusted off the sewing machine that had been sitting in our garage for years and gave it my all. Here's the first article of clothing I've ever sewn!
Me and Kali were pretty happy and excited to finish her hat so decided to move forward with her apron. The same site that had the chef's hat tutorial also had an apron tutorial, but we wanted something a little more girlie. After searching the internets for free patterns/tutorials and not finding anything we totally liked, I decided to design it myself, figuring out the steps along the way.
This totally was a learning process for me. It sure helps to have the right tools - a cutting mat and rotary cutter would have saved so much time. Even a proper working space would have helped as I ended up doing a bunch of the work on my bedroom floor. Also thought it was funny how little sewing is actually done when sewing clothing. I spent the majority of the time measuring, cutting, pinning, and lots and lots of ironing. There was also quite a bit of unsewing involved. I swore I bought a seam ripper, but it was nowhere to be found.
In the end the hardest part was finally putting it all together. The waist band was the final step and involved attaching the ties, skirt and bodice together. I had to redo it a couple times until I got it to work.
And here we are...The Kali Apron.
Did I mention it's reversible? Can't wait for Halloween now...and the best part about it is we can enjoy her costume long after Halloween is over. So thankful to my beautiful daughter Kali for the inspiration and patience. Since I didn't have a pattern I had to measure and try stuff on her several times :)